
[:en]
In this page, we will show you an example of Plasma Lower Eyelid tightening, the healing progression and the results three months after.
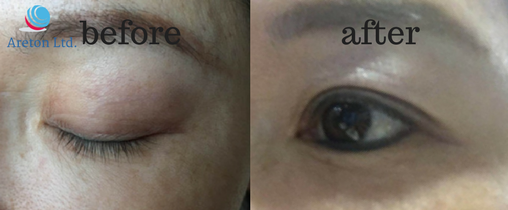
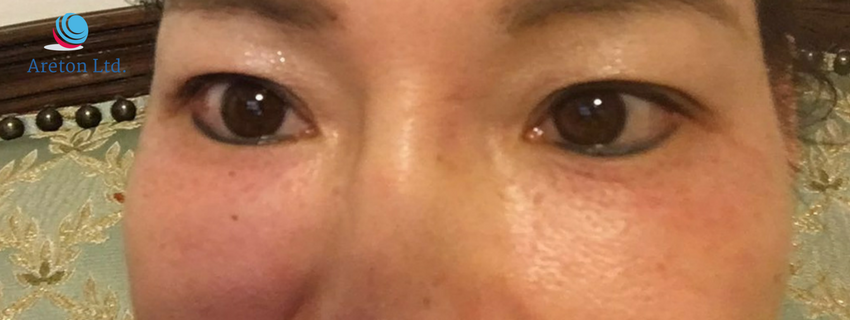
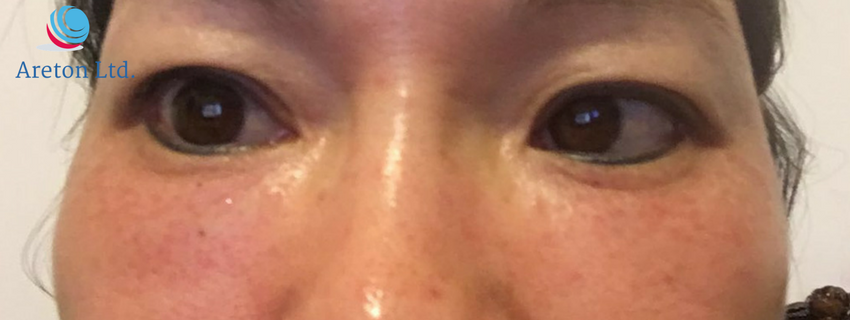
Before the plasma lower eyelid tightening and three months after.
The video will show you the entire treatment, provide a short summary of the healing progression and the results. You can limit yourself to watching the video, however, if you want to learn more about the healing progression and results, all the information is presented later in this case study. You should keep in mind the this is first treatment the subject had undergone and the results may not be dramatic, however, it is possible to appreciate the improvements. In order to achieve the desired results a number of treatments are required. On average, for a similar case, a minimum of three treatments are recommended. The following video provides you with a quick overview of this case study.
In particular, the video shows you:
- A summary of the before images of right and left lower eyelids.
- The healing progression summary.
- The entire procedure.
- In the end, we show a comparison between before and after the procedure.
If the video above was of interest and you would like to find out more about this case study, then you can further explore the content of this web-page which shows more details about this specific treatment and provides more information about the results.
The device used for this procedure was the BeautyTeck. This device has 32 power levels and two batteries configurations.
The subject is Asian and 37 years old at the time of the first treatment.
The results are as expected after this type of treatment. As we know, normally the scabs fall off a week after the procedure. This is the first and only case where the scabs have been present for over two weeks.
Treatment intensity and device power setting.
For this treatment, the device was set at level eight (with three battery configuration), which is very strong for this type of treatment. Normally, when you first attempt this type of procedure, a very low-level power setting is recommended i.e. level one (three battery configuration).The duration of the arc was very short, almost instantaneous.
The distance between the spots varied from a fraction of a millimetre to 2 millimetres depending on the area treated.
This is considered a medium-high intensity treatment.
The numbing product used was a 20% lidocaine based cream. This provided a very good degree of numbness. Particular care has to be taken so that the numbing product does not get into the eyes. In case the numbing product gets into the eye/s the procedure has to be stopped and the eyes must be rinsed with clean running water immediately.
During the procedure, the numbing product is removed in patches and not all at once. This is because the effect of the numbing product is brief therefore if removed all before the treatment by the time the aesthetic practitioner reaches the end of the treatment or before the end of the treatment the area can have lost desensitization.
Remember, never to place the spots inside the wrinkles themselves and always work between the lines. If you find it necessary to achieve a better skin coverage pull the skin and place the spots randomly.
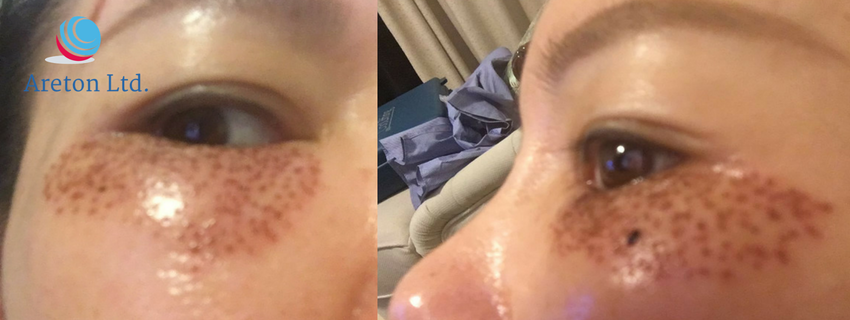
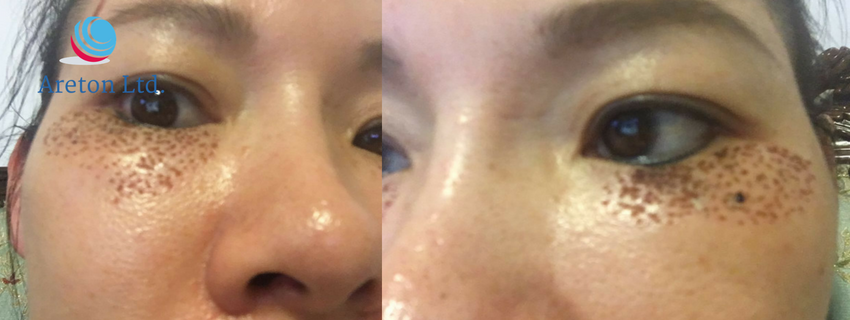
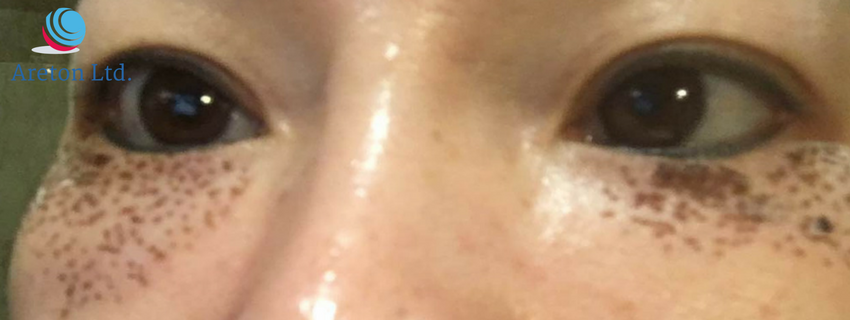
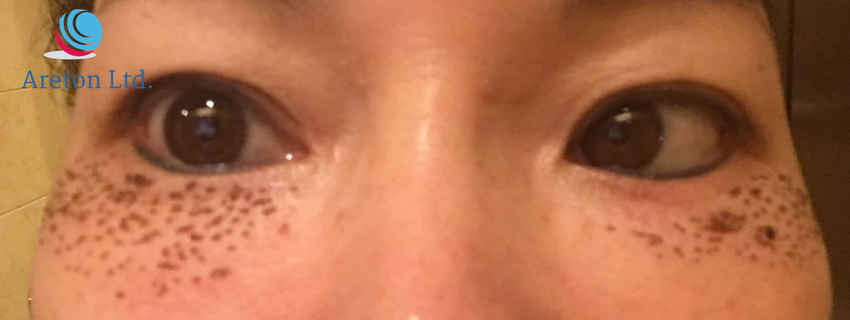
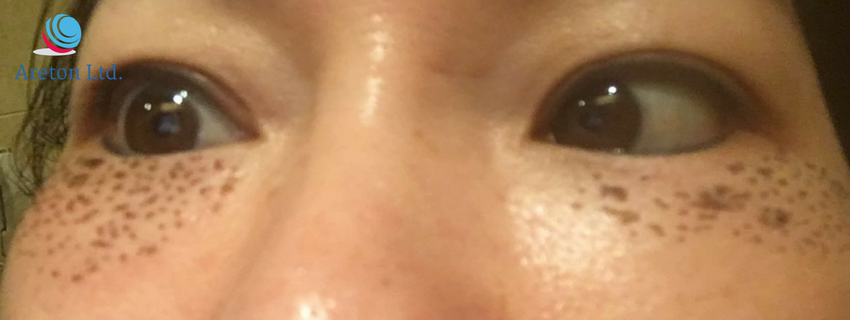
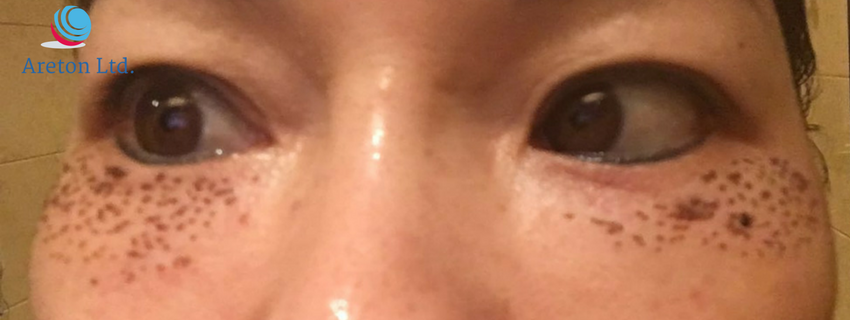
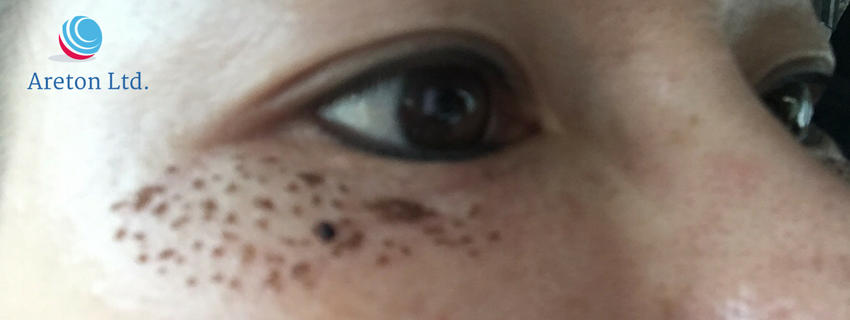
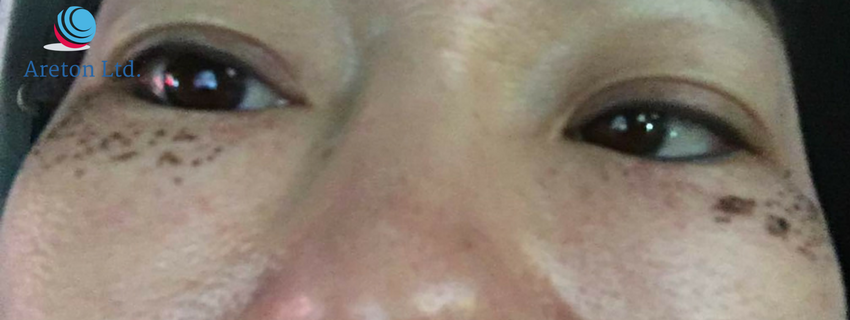
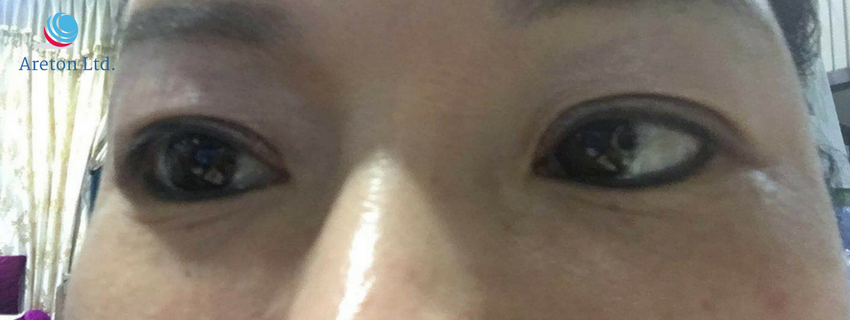
We have taken plenty of detailed before pictures. Here you will find them all. Remember it is very important to take plenty of before pictures because this is the reference of comparison which will be used to show the improvements. In most cases the improvements are only minor after each session, therefore taking several before pictures are paramount to allow you to show the improvements after the treatment.
Here you can clearly see lines below the eyelids. This is a very common sign of ageing. This is a closeup for left eye and fine expression lines are visible below the eyelids
Below you will find all the before pictures. Click on the one you live to view them.
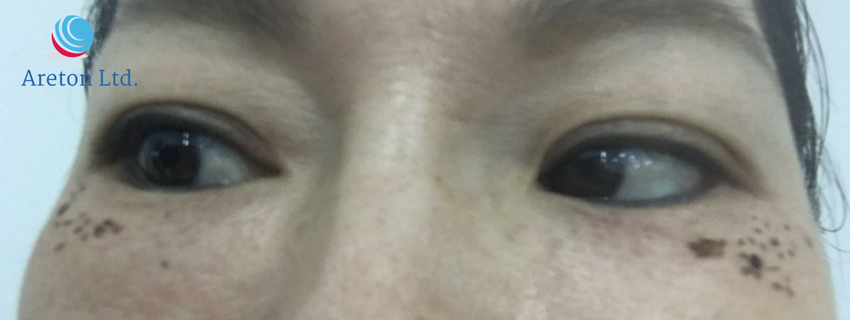
[gallery_bank type="images" format="thumbnail" title="true" desc="false" responsive="true" display="all" sort_by="random" animation_effect="bounce" album_title="true" album_id="31"]You can appreciate the improvement after the first treatment. On average three treatments are advisable to achieve substantial results. This is the area which shows the signs of ageing quite soon even using very good skin care products.
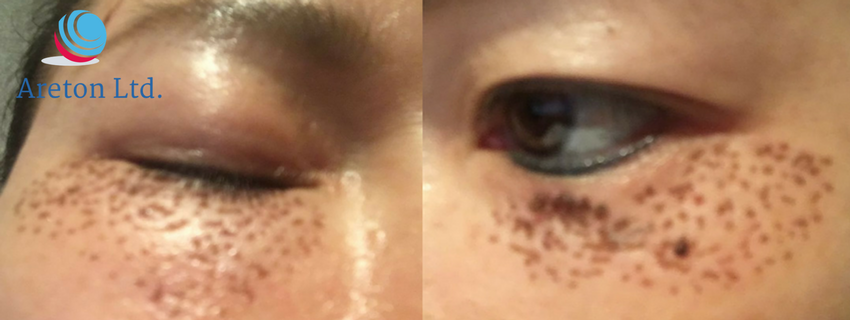
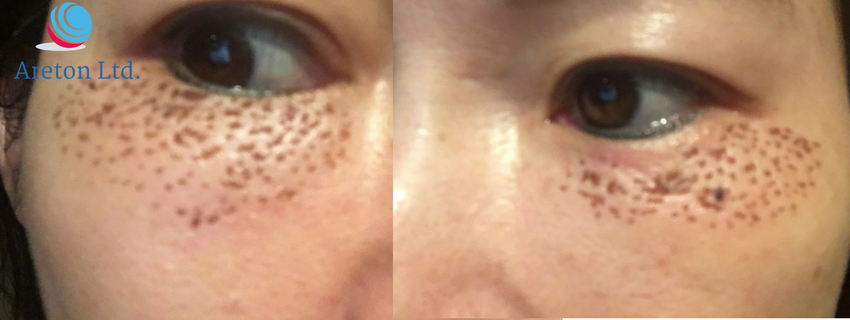
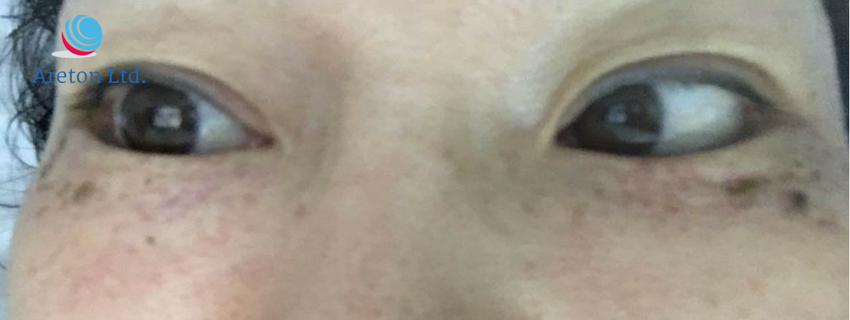
Left eye, before and three months after the plasma treatment.


Right eye, before and after the treatment.
In this case, the subject did not use any makeup during the healing progression. Instruct the customer to apply the antiseptic cream twice a day. The area should heal in few weeks ( 2-3 weeks generally) after the treatment. No makeup (even Mineral makeup) should be applied until the scabs are fallen off. You have to avoid sun exposure first three months after the treatment. It usually peaks from the fourth to six-day after and it disappears 14 to 16 days after the treatment.
If you are interested You can click on the gallery below the main picture to see all photos.
The subject resumed all normal professional activities 4 days after the treatment, once the discomfort and the swelling subsided completely.
This is the longest period it took for the scabs to fall off on their own accord. All the scabs fell off 17 days after the treatment. This is a peculiar case, as normally the scabs fall off within a week after the treatment. This is probably due to the skin type and the relatively high power level the device was set at during the treatment. It is believed that the high power setting of the device caused a deeper than usual ablation into the skin which in turn caused thicker scabs which lasted longer than usual.
After the scabs fell off on their own accord, the subject reported the presence of little marks were the ablative spots were placed. However, as expected these disappeared within three months after the treatment. As a rule of thumb, these marks can remain there for a few weeks but they will disappear on their own accord.
These marks can only become permanent if the subject exposes herself/himself to UV light within three to four months after this type of aesthetic treatment.

This is the area the day after treatment. Discomfort was reported in terms of mild pain and burning sensation.

Swelling developed two days after the treatment .
Three days after treatment the swelling increased and the level of discomfort subsided slightly.
Swelling almost disappeared and the scabs started to form. Minimal discomfort being replaced by an itching sensation. The subject resumed all normal professional activities .
Scabs formed, no swelling, no discomfort, just an itching sensation.
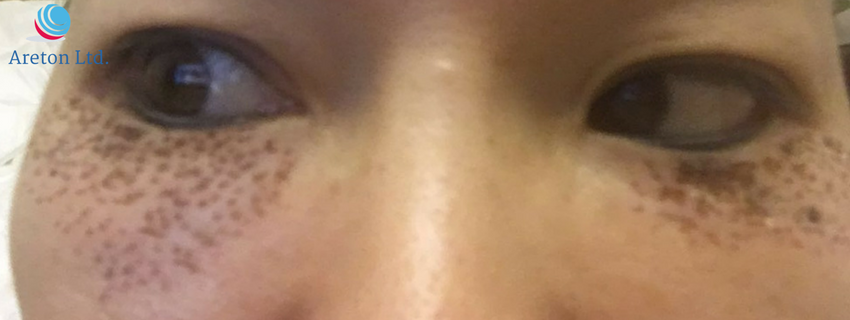
Photo after 6 days of the treatment. scabs starting to fall off.
the smaller scabs keep falling.
Scabbing keep falling.
The itchy sensation continued as the scabs started to fall off on their own accord
Improvement of the area is clearly noticeable.
Eleven days after treatment. The subject said there where marks even when the scabs fell off. These marks disappear after 2 weeks.
Detail of the left eye
14 days after treatment . There are very few residual scabs left.
Frontal picture shows further improvement, the scabs are falling off daily.
Detail of both eyes during the healing phase.
17 days after treatment. No sign of scabs left. The marks also disappear after few days.
18 days after treatment. No makeup still. The subject used sun protection in the lower eyelid area.

Close up of both eyelid 20 days after treatment. The area has no scabs left. It is still in the healing phase and good care need to be taken.
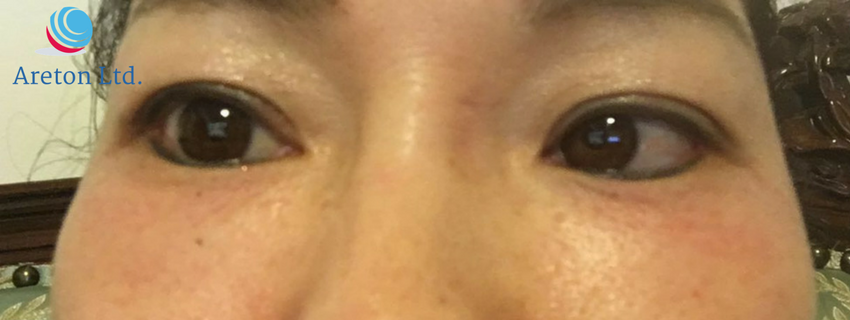
21 days after the voltaic plasma treatment. The area is still subject to minor improvements over weeks following the treatment.
 [gallery_bank type="images" format="thumbnail" title="true" desc="false" responsive="true" display="all" sort_by="random" animation_effect="bounce" album_title="true" album_id="37"]
Take the eyelid tightening test - Click Here
En esta página, le mostraremos un ejemplo del estiramiento del párpado inferior con plasma, la progresión de la curación y los resultados tres meses después.
Antes, el plasma baja el párpado inferior y tres meses después del tratamiento.
El video le mostrará el tratamiento completo, proporcionará un breve resumen de la progresión de la curación y los resultados. Sin embargo, puede limitarse a ver el video. Si desea obtener más información sobre la progresión de la curación y los resultados, toda la información se presenta más adelante en este estudio de caso. Debe tener en cuenta que este es el primer tratamiento al que se ha sometido el sujeto y que los resultados pueden no ser dramáticos, sin embargo, es posible apreciar las mejoras. Para lograr los resultados deseados se requieren varios tratamientos. En promedio, para un caso similar, se recomiendan un mínimo de tres tratamientos. El siguiente video le proporciona una descripción general rápida de este caso de estudio.
En particular, el video se muestra:
- A Un resumen de las imágenes anteriores de los párpados inferiores derecho e izquierdo.
- El resumen de la progresión de la curación.
- Todo el procedimiento.
- Al final, mostramos una comparación entre antes y después del procedimiento.
If the video above was of interest and you would like to find out more about this case study, then you can further explore the content of this web-page which shows more details about this specific treatment and provides more information about the results.
El dispositivo utilizado para este procedimiento fue el BeautyTeck. Este dispositivo tiene 32 niveles de potencia y dos configuraciones de baterías.
El sujeto es asiático y tiene 37 años al momento del primer tratamiento.
Los resultados son los esperados después de este tipo de tratamiento. Como sabemos, normalmente las costras se caen una semana después del procedimiento. Este es el primer y único caso en el que las costras han estado presentes durante más de dos semanas.
Intensidad de tratamiento y ajuste de potencia del dispositivo.
Para este tratamiento, el dispositivo se configuró en el nivel ocho (con tres configuraciones de batería), que es muy fuerte para este tipo de tratamiento. Normalmente, cuando intenta este tipo de procedimiento por primera vez, se recomienda un ajuste de potencia de muy bajo nivel, es decir, nivel uno (configuración de tres baterías).La duración del arco fue muy corta, casi instantánea.
La distancia entre los puntos varía de una fracción de milímetro a 2 milímetros dependiendo del área tratada.
Esto se considera un tratamiento de intensidad media-alta.
El producto anestésico utilizado fue una crema a base de lidocaína al 20%. Esto proporcionó un muy buen grado de adormecimiento. Se debe tener especial cuidado para que el producto adormecido no entre en contacto con los ojos. En caso de que el producto anestésico entre en contacto con los ojos, es necesario detener el procedimiento y enjuagar inmediatamente los ojos con agua corriente limpia.
Durante el procedimiento, el producto anestésico se retira en partes y no todos a la vez. Esto se debe a que el efecto del producto anestésico es breve, por lo tanto, si se elimina todo antes del tratamiento en el momento en que el especialista en estética llegue al final del tratamiento o antes del final del tratamiento, el área puede haber perdido la desensibilización.
Recuerde, nunca coloque los puntos dentro de las arrugas y siempre trabaje entre líneas. Si lo considera necesario para lograr una mejor cobertura de la piel, tire de la piel y coloque las manchas al azar.
emos tomado un montón de fotos antes detalladas. Aquí encontrará todos. Recuerde que es muy importante tomar muchas fotos antes, porque esta es la referencia de comparación que se usará para mostrar las mejoras. En la mayoría de los casos, las mejoras son mínimas después de cada sesión, por lo tanto, tomar varias fotos antes de que sean importantes para permitirle mostrar las mejoras después del tratamiento.
Aquí puede ver claramente las líneas debajo de los párpados. Este es un signo muy común de envejecimiento. Este es un primer plano para el ojo izquierdo y las líneas de expresión fina son visibles debajo de los párpados.
A continuación encontrarás todas las fotos de antes.
[gallery_bank type="images" format="thumbnail" title="true" desc="false" responsive="true" display="all" sort_by="random" animation_effect="bounce" album_title="true" album_id="31"]Se puede apreciar la mejoría después del primer tratamiento. En promedio se recomiendan tres tratamientos para lograr resultados sustanciales. Esta es el área que muestra los signos del envejecimiento muy pronto, incluso utilizando productos de cuidado de la piel muy buenos.
Ojo izquierdo, antes y tres meses después del tratamiento con plasma.
Ojo derecho, antes y después del tratamiento.
En este caso, el sujeto no usó ningún maquillaje durante la progresión de la curación. Indique al cliente que se aplique la crema antiséptica dos veces al día. El área debe sanar en pocas semanas (2-3 semanas generalmente) después del tratamiento. No se debe aplicar maquillaje (incluso el maquillaje mineral) hasta que se caigan las costras. Tienes que evitar la exposición al sol los primeros tres meses después del tratamiento. Por lo general, alcanza su nivel máximo desde el cuarto hasta los seis días posteriores y desaparece de 14 a 16 días después del tratamiento.
Si está interesado, puede hacer clic en la galería debajo de la imagen principal para ver todas las fotos.
El sujeto reanudó todas las actividades profesionales normales 4 días después del tratamiento, una vez que la incomodidad y la inflamación desaparecieron por completo.
Este es el período más largo que tomaron para que las costras se cayeran solas. Todas las costras se cayeron 17 días después del tratamiento. Este es un caso peculiar, ya que normalmente las costras se caen dentro de una semana después del tratamiento. Esto se debe probablemente al tipo de piel y al nivel de potencia relativamente alto en el que se configuró el dispositivo durante el tratamiento. Se cree que la configuración de alta potencia del dispositivo causó una ablación más profunda de lo habitual en la piel, lo que a su vez causó costras más gruesas que duraron más de lo habitual.
Después de que las costras cayeron por su propia cuenta, el sujeto informó la presencia de pequeñas marcas en las que se colocaron los puntos ablativos. Sin embargo, como era de esperar, estos desaparecieron dentro de los tres meses posteriores al tratamiento. Como regla general, estas marcas pueden permanecer allí durante algunas semanas, pero desaparecerán por su propia cuenta.
Estas marcas solo pueden volverse permanentes si el sujeto se expone a la luz UV dentro de los tres o cuatro meses posteriores a este tipo de tratamiento estético.
Esta es el área el día después del tratamiento. El malestar se informó en términos de dolor leve y sensación de ardor.
La hinchazón se desarrolló dos días después del tratamiento.
Tres días después del tratamiento, la hinchazón aumentó y el nivel de molestia disminuyó ligeramente.
La hinchazón casi desapareció y las costras comenzaron a formarse. Mínima molestia siendo reemplazada por una sensación de picazón. El sujeto retomó todas las actividades profesionales normales.
Se formaron costras, sin hinchazón, sin molestias, solo una sensación de picazón.
Foto a los 6 días del tratamiento. Las costras comienzan a caerse.
las costras más pequeñas siguen cayendo.
Las costras siguen cayendo.
La sensación de picazón continuó cuando las costras comenzaron a caerse por sí solas.
La mejora de la zona es claramente notable.
Once días después del tratamiento. El sujeto dijo allí donde marcas incluso cuando las costras se cayeron. Estas marcas desaparecen después de 2 semanas.
Detalle del ojo izquierdo.
14 días después del tratamiento. Quedan muy pocas costras residuales.
La imagen frontal muestra una mejora adicional, las costras se caen diariamente.
Detalle de ambos ojos durante la fase de curación.
17 días después del tratamiento. No queda rastro de costras. Las marcas también desaparecen al cabo de unos días.
18 días después del tratamiento. Todavía no hay maquillaje. El sujeto usó protección solar en el área del párpado inferior.
Cierre de ambos párpados 20 días después del tratamiento. El área ya no tiene costras. Todavía se encuentra en la fase de curación y se debe tener buen cuidado.
21 días después del tratamiento con plasma voltaico. El área aún está sujeta a mejoras menores durante las semanas posteriores al tratamiento.